Did you know that HVAC pros charge at least $2000/per head for mini split installation?
If you are looking to install a new mini split AC, but don’t want to spend so much money of professional installation, you actually have the option of doing the install yourself!
Let’s take a close look at what it takes to do a DIY mini split install and the options you have.
After all, I was that homeowner who is rather handy, and did not want to pay thousands of dollars extra for a pro job, so I did it myself! In my home, and even in my camper! So you can do it too.
DIY Mini Split Install – What Does It Take?
Ok, it was nice to watch myself install this … but let’s get back to you.
So here is what you need to consider, before you decide to to the job yourself:
1: You will need to buy special tools that you can only use for HVAC work. If you plan to install more than 1 zone, these tools will more than pay for themselves, and you can later (try to) sell them on CraigsList, FB Marketplace or Ebay.
I would not recommend buying used tools, as you cannot test them, and have no “return policy”. Better to take a small lost on new tools, then end up with broken used tools.
2: You will be working with Controlled Refrigerants. To do so LEGALLY, you actually need an EPA Section 608 Certification (EPA Card). You also want to know how to be safe working with refrigerants. Now I know many people “just do it” … But legally you need an EPA card. In fact, there is a guy on YouTube who got EPA card just so he could install his mini split!
3: You will be working with High Voltage (240V) electricity, which can be dangerous, and usually requires a building permit.
4: You will need to properly select the equipment for your job. I literally spent 30 days researching the brands, reading spec sheets and installation manuals, reading articles, calling tech support of various manufacturers, talking with HVAC contractors, etc, just to select the brand and model of my 1st (Fujitsu -15°F 9K single zone) heat pump.
If you want a multi-zone, you should do your homework. Fortunately, there is a lot more “for DIY homeowner” information these days, than there was 5 years ago, and I’m here to help!
5: You will need to find OR create a proper placement for our outdoor condenser unit, and think through the placement of each indoor unit, and how to route the lineset, and where to place the condensate drains.
6: Finally, you will need to install it!
Honestly, while I was very happy I saved around $1500-2000 on my 1st system, and subsequently over $15,000 on my whole-house setup, I had immense pleasure doing it myself – especially the very first one!
To address items #2 and #3, I hired an HVAC technician for the first job, to do all the HVAC connections, pressure test, pull the vacuum, etc.
He did a good job, and it cost me $350. I think I would do better, but, it never leaked, never needed repairs, and worked non-stop for 4 years (heating all winter and cooling all summer).
I later decommissioned that unit, to replace it with a 4-zone big boy. My first heat pump is still fully functional and I intend to use it in my future project (shed-office).
Selecting Mini Split Equipment
I would say that unless you live in Florida or Arizona or New Mexico, go with C&H Sophia Hyper Heat model (look for “-22F” and “Hyper Heat” markings). Model numbers for OUTDOOR UNIT will typically begin with “CH-HYP“. These will also have the highest SEER rating for cooling!
The price difference between the low-end and Hyper models is only $250-500 (even for large 48000 BTU models). In multi-zone config, indoor units will be the same for basic and hyper models.
Even in warmer climates, you occasionally have very cold winter days, and as it gets colder outside, heat pumps loose “heating capacity” or amount of heat they can produce. Sophia Hyper has larger compressor, and outputs more heat at colder temps, vs regular +5°F models.
BTW: Even though in my home I have Fujitsu, I just happen to be a Fujitsu Preferred Contractor. Nevertheless, I do think C&H is a very decent system, and I even plan to replace a Fujitsu in my camper with a Cooper & Hunter (because I need a 115V model).
Here is an in-depth guide to choosing the right mini split for your house.
Selecting The Right Mini Split Unit Size
Most people will not use a heat pump as primary heating system, thus you can use “next size up” from our calculator’s Cooling BTU Load.
For example, if estimated Cooling BTUs number is 16520, go with 18000 BTU mini-split, which is next size up. C&H heat pumps have inverter compressors and will adjust how much output they produce, depending on load.
So even if you oversize a little, they will work at proper load, and will be great for cooling and moisture removal.
If you do plan to use your mini-split for heating, you will need to upsize your system. Also, I highly recommend improving insulation & windows in your home first. These upgrades will make wonders.
On most days, two 48,000 BTU C&H Hyper systems can heat a typical home in the New England winter. But on extra cold days (-10°F and below) they may have hard time keeping up the temps inside above 65°F.
Use our Mini Split Size And Cost Calculator to estimate the size of the unit your house needs.
Other Parts Needed for Mini Split Installation
Most C&H systems come with an Installation Kit including 16ft OR 25ft Pre-Flared and Insulated Copper Line Set, Communication Wires between Indoor and Outdoor unit, Small Accessories and a Drainage Extension.
The problem is that in most cases these are either too long or too short. Second problem – factory flares are usually GARBAGE!
Third problem – Cheap Flare Nuts on the lineset usually do not meet pressure requirements of R410A refrigerant, which in heating mode can go as high as 600+ PSIg – trust me, I recorded 615 PSI, a number which is not even on a pressure-temperature chart!
So you will likely need a separate large coil of lineset – 50ft or 200ft (in case of a 4-zone install), and a roll of 3/14 or 3/16 AWG signal wire specifically made for MINI SPLITs (don’t use cheap substitute from Home Depot).
NOTE: Most mini-split lineset rolls come INSULATED, in 1/4″ and 3/8″ diameters. You will need both tubes. One for low side (3/8″) and one for high side (1/4″). Bigger C&H split systems (24K BTUs or more) may and likely WILL require 1/4″ and 1/2″ lineset pairs. Read unit specs before you order lineset. You may need all tree 1/4″, 3/8″ and 1/2″ sizes in the same install.
Based on install manual for a 48K multi-zone model, here are the lineset sizes:
Indoor Unit (Btu/h) Liquid Gas 7K/9K/12K 1/4″ 3/8″ 12K/18K 1/4″ 1/2″ 24K 3/8″ 5/8″
You will need strain relief connector for your signal wire, liquid tight flex conduit to connect condenser to the AC disconnect. You will need anywhere from 6 to 12 AWG THHN stranded wire to connect your heat pump to power, AC disconnect box itself, etc.
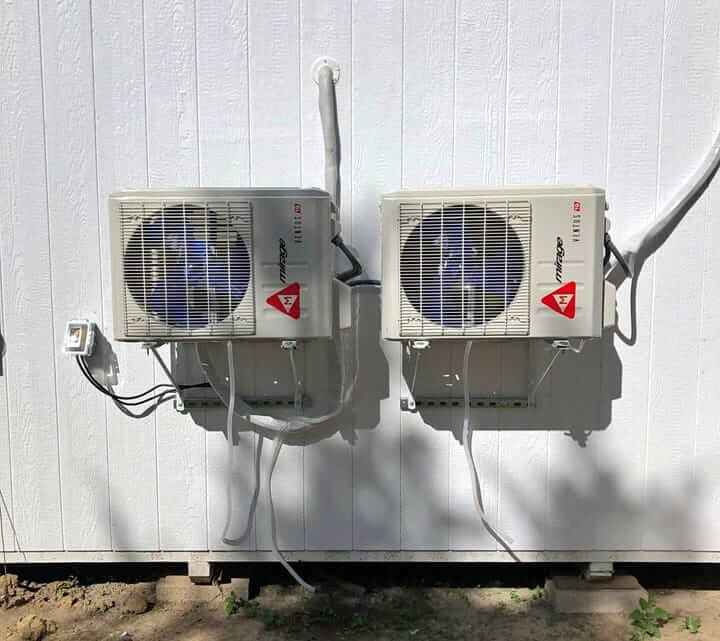
Mounting This is critical if you plan to heat wit your C&H Mini Split – place the outdoor unit at least 18″ above ground! I prefer 24″ stand on top of concrete pad, or wall-mount 36″ above ground.
If you plan to use of in cooling mode only, you can buy a foam HVAC pad, and place the condenser on top of it on the ground. Just make sure ground is leveled.
In most cases you will probably use a wall bracket. I recommend putting no more than 150-200 lbs on a wall bracket (2-zone max). A 3+ zone condenser I would always put on a stand if possible.
Although in NYC, you see 4-zone condensers on a wall bracket all day long. But to me, they look like they are just about to fall (tilted outwards).
Finally, you will need tools…
Tools For DIY Mini Split Installation
Here are the ESSENTIALS – without these, you cannot have a quality HVAC install:
- Vacuum Pump – If you plan to use it only a couple of times, you can get something in a range of $100. Otherwise I recommend a better quality USA brand. I have a Robinair 5 CFM, 2-stage. Also consider MasterCool, JB, FieldPiece, CPS.
- R410A Manifold Gauges + Hoses – if you are not a pro, and even if you are – there is only Yellow Jacket. Make sure you get one that’s for R410A gas!
Do not buy cheap Chinese gauges / hoses for $20/$30/$40. They leak, show incorrect pressure, etc, etc. It is critical to have a perfectly functioning gauges – otherwise you don’t know what pressure/temperature you have, and cannot do proper installation. This is one item you don’t compromise on.
I used model Yellow Jacket 42201 with hoses that have shut-off valves. Highly recommend these vs. straight hoses (no valves). You don’t need the fancy plastic handle one, and the 4-port gauges. Just basic brass body. But get those hoses with valves!
- Flare Tool – You need a flaring tool for R410A … most of them are. This is where you can buy a no-name, and don’t need fancy brand name. I got this one (FORSUN) for $29 … not it’s $25 🙂
- Flare Torque Wrench – not required, but, highly recommended, because if you over-tighten, you can damage the flare or crack the flare nut, causing leaks. I would only recommend Yellow Jacket with fixed width jaws (made specifically for Mini Splits. I don’t recommend adjustable jaws or digital.
- Micron Gauge – I have CPS VG200, it’s simple and works great … too bad it does not have back-lit display. This is where I would NOT recommend a Yellow Jacket (they are great for mechanical tools, but digital not so much). We had 15 of them in my HVAC school, and out of 5 that I worked with, they were all problematic. And they have terrible user interface. Also don’t buy no-name junk. This is another critical item.
Pressure Testing & Nitrogen
Pressure testing is done with dry nitrogen gas. The problem here is nitrogen. Most people cannot easily obtain it, and even if you could, you also need a Nitrogen Tank. This tank must be DOT certified for transporting in your car. So you can’t just buy cheapest Nitro tank off Amazon…
Then you need gas itself. You can buy it from Welding Supply or HVAC supply. I think it is much cheaper at welding supply. You can purchase it with tank also. Or maybe you can find Nitrogen tank on Craigslist / Facebook Marketplace.
Tank must have a port for a Nitrogen Regulator – if you go with Nitro, buy only UNIWELD regulators. Don’t waste you money of cheap Chinese no-name knock-offs.
So what I did – I just bought a tank from my HVAC supplier … it was very expensive (~$200) … but was a one time purchase. Since I’m in the trade (albeit part time), i used the tank many times. For a one-off install … I don’t know what to recommend.
You can skip pressure test … I would not recommend it, but, you can do it. The reason you do pressure test is to check for leaks and see if system will hold 400-500 lbs of pressure. Most likely it will. Just make sure you make your own flares, AND use factory flare nuts that come with your mini-split! Do not use the ones that come in a lineset starter “kit”.
Finally, if you properly torque your flares (with a Flare Torque Wrench), you will most likely not have leaks, and system is designed to handle the pressure. So pressure test can technically be skipped (again, not recommended, but…).
So you next main concern is leaks, which will be detected during a vacuum test, using a micron gauge. If after pulling vacuum for 20 minutes/ton, you have under 500 microns and the gauge, and it holds under 500 – you should have no leaks. I vacuum down to 200-240 microns, and then it settles around 300-350 after 30 minutes.
If you can’t get below 2000-3000 microns – you have a leak. If it rises over 500 microns after 30 minutes you have a slow leak. Either torque your flare connections a little more, or redo them. If it holds under 500, you should be good!
That’s about it. Make sure you check out our DIY Mini Split Install Guide for all the details.
Why Such A Big Price Difference Between PRO HVAC Install vs DIY?
To put it simply, it is expensive to run an HVAC business, and labor costs are high (especially in 2023 and beyond).
Also, professional HVAC contractors go through years of training, “sweat and tears” of being a helper > journeyman > master HVAC technician.
You are paying for experience, time, and attention to details, to ensure that your mini-split system is installed properly, would not leak refrigerant and need a “fill-up” every spring, and ultimately break down.
Finally you are paying for tools, work trucks, insurance, overhead, and finally warranty.
If a contractor does not make money after all bills and expenses were paid, they will be out of business in no time. Who will then fix your HVAC system if something goes wrong?
***
There are a lot of homeowners on Facebook / Reddit / forums, etc., that mention the high cost of HVAC installation – especially ductless mini-splits.
One of the most common arguments – why in “other countries” it costs 5 times less (typically $400-500) to install one zone, and in US, about $1500-2000 per head.
Well, being a homeowner turned HVAC technician, and speaking with installers form “other countries” I have a definitive answer:
In “other countries” they skip the most-critical steps of any HVAC install, which results in a short life of you HVAC equipment – compressor burnout, constant freon leaks, and other breakdowns, which end up costing you more, than paying a professional.
Actual ad photo from Facebook Marketplace Boston – can you spot what’s wrong with it? (HINT – everything!)
Ugly Mini-Split Install – From an Ad in Facebook Marketplace Boston
Mini Split AC Installation Steps That Are Skipped In “Other Countries”
1: They DO NOT do nitrogen Pressure Testing of the system, which is intended to see if lineset (copper tubing) connections are done properly, and there will be no leaks.
While this step can be skipped (as we will discuss in the next section – DIY Installation), it is highly advisable to go through with it. All professionals (should) do this step, any time they “open the system”.
2: They often DO NOT do vacuum pull on the system. It is critical to not have any air in the copper lines, before freon is added / pumped in. Air contains moisture. Moisture mixed with compressor oil creates acid.
Acid eats away windings on the compressor motor, causing a short, and a burnout. After a burnout, you might as well trash the whole ductless heat pump. Best case – you will have to replace condenser, which is the most expensive part.
You would still have soot and ash in the copper lines, which will cause other breakdowns and malfunctions in the future, and are nearly impossible to clean out.
From my conversations with HVAC technician in “other countries”, they often do not pull ANY vacuum, if job is difficult or far away, as they get pain a fixed amount, and puling vacuum is time consuming. Best case scenario – they pull vacuum for 5 minutes, to get pressure to -30 inches of water column.
It is industry standard to pull vacuum for 20 minutes per ton. So a 4 ton (48,000 BTU) heat pump will need 80 minutes of vacuum pull, and then 30 minutes of micron gauge monitoring, to make sure micron level is BELOW 500 microns, after 30 minutes. If it’s above 500, there is a leak, and air in the system. Air > acid > eventual burnout!
3: They DO NOT test system for leaks, which ensures that after a year or two, system will be low on freon (refrigerant), and your installed will need to come back for a “quick charge”, costing you about $300-400 or more… each time!
4: They DO NOT install line hide, to cover up ugly copper lines.
5: They DO NOT connect your AC to an outdoor AC disconnect, per electrical and local building codes.
In fact, because most of the world runs on 220V electric system, they can simply plug in your heat pump into a wall outlet.
In the US, an air conditioner must be properly connected to an AC disconnect, and properly grounded. Often, this can only be done by a licensed Electrician.
6: In “other countries”, a typical install takes about 2-4 hours per zone. Often, they swap out old unit, reuse copper lines, electric wires, and wall mounts, connect the copper (not even do new flares), wiring, and don’t pull vacuum/pressure test.
In my case, I cannot do it faster than 1+ full working day per zone! A 4-zone install is 2-3+ work days for a 2-man crew.
Now do you want to have your brand new $2,000-$7,000 mini-split installed like they do it in “other countries”? I didn’t think so 🙂
Not ready to do it yourself? Get local pros to help you!